Friday 13 September 2019

Restoring Triumph Bonneville cylinder head after removal of broken stud

Removing a broken stud in the cylinder head had left a bit of a hole which needed to be filled in before the head could be re-drilled and tapped for a replacement stud to be fitted.

A small gas cup was needed on the TIG torch and quite a bit of stick-out of the Tungsten in order to get into the hole.


Just a bit of filler rod added to start with and then
the torch held at about 150 Amps until the filler flowed into the casting.


Filler rod added bit by bit until the metal had been built up to a level just above the top face of the head.


 The cylinder head could then be put on a milling machine and machined flat.

    Followed by some hand work with a "Dremel" type tool to smooth off the excess metal added to  
    the cooling fin adjacent to the repair.


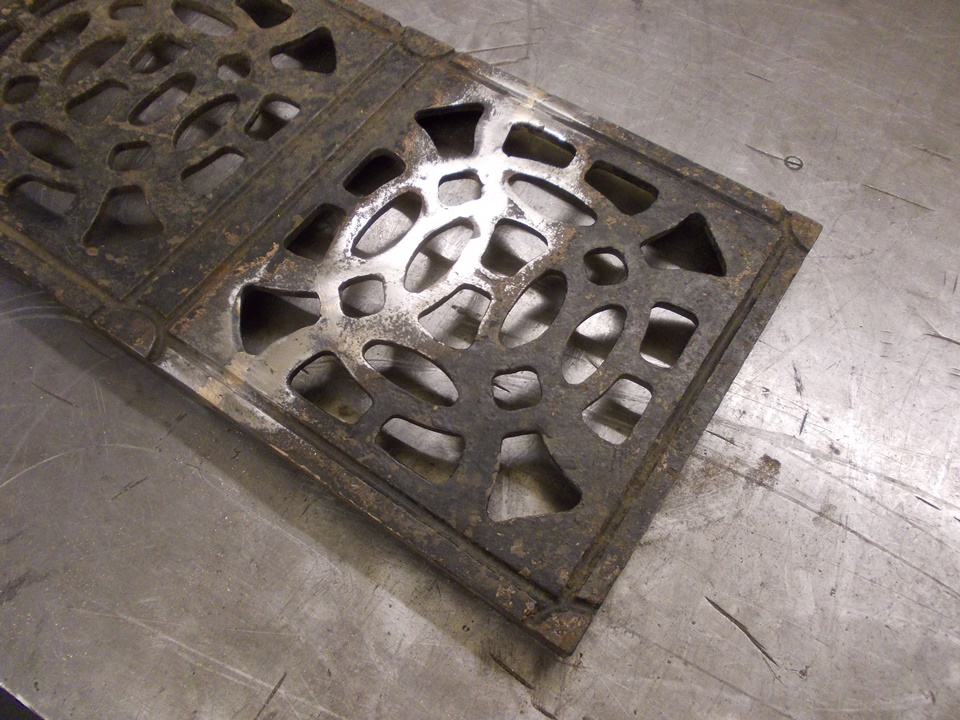
The finished job, ready for the customer to drill and tap the head for a new stud.

Sunday 28 May 2017

Cast Iron Step Repair

This is a broken Cast Iron landing step for an old spiral staircase.


 Edges of the crack ground out to a "vee".

 First attempt at welding - stick welded using Nickel based rods. Pretty horrible - old rods, possibly wrong power setting, out of practice & even though these rods are meant for "cold" welding, it probably would have come out a lot better if the casting had been pre-heated.

 After grinding out a lot of the Nickel stick welding, I tried again, this time TIG welding using Phosphor Bronze rods.

 The welds on the under side were left.

 The ones on top ground smooth

Ready to be sanded all over before re-painting.

Tuesday 1 February 2011

Special inlet manifold/plenum chamber for an Escort Turbo engine fitted in a Kit Car

Our customer had fitted a Ford Escort Turbo engine into a Caterham/Lotus 7 type of kit car. The original inlet manifold for the transverse mounting in the Escort wasn't suitable for the inline orientation in the kit car, so a new, or rather radically modified, manifold was needed.
This was a fairly straightforward aluminium welding job. The customer brought us the large aluminium tube already cut to size & with holes cut where the (already cut down) inlet manifold needed to be attached.


We then had to weld on a disc at each end of the tube - at one end a blanking plate with a threaded hole for a sensor

and at the other end, one to take the throttle body.


This shows the throttle body mounted in position.

Friday 24 December 2010

Twin Disc conversion for Triumph Trident

First step was to machine the caliper bracket from a suitable aluminium billet.

A flat was milled on the fork leg.

The bracked was placed in position on the fork leg & held with two small tack welds.

 Followed by a larger tack on the back of the bracket.


The bracket was fully welded to the fork leg on both sides & the welds were smoothed, blended & lightly polished. Then a bracing rib was added.
The finished fork leg after final smoothing, blending & light polishing of the welds and drilling & tapping the holes for the caliper bolts. New one on the right, original on the left.

Brake Caliper Bracket for twin disc brakes on Triumph Trident

Wednesday 21 July 2010

Kawasaki ZX Motorcycle Frame

This Alloy motorcycle frame was brought to us when the customer, having taken the engine out, noticed that the box section rear cross member wasn't actually fixed to the main frame. It seemed as if the weld had cracked. However, when we ground the metal away to provide a good chamfer for re-welding, we found that the cross member was anodised where it entered into the side part of the frame. It appears that it was never properly welded in the first place! With the engine installed, the engine mounting bolts held everything together so the fault never became apparent until the engine was taken out.


Not the neatest of welds but good & strong & definitely joining both parts together!


Sunday 27 June 2010

Cracked Gearbox - disaster!

This was a Ford Escort gearbox which had been cracked underneath & was leaking oil. It was brought to us complete (just the gearbox, not the whole car!) & still with oil in it
Could we weld it up?.......
One problem was that we didn't know how thick the casing was so couldn't run the risk of using too much power & burning a hole through the casing & couldn't grind out the cracks for fear of going through. That exacerbated the main problem, that the cracks were dirty/oily & that though the outside of the casing can be cleaned, the inside of the casing was still oily. Welding over the cracks just drew the dirt & oil out & contaminated the weld.


This can be seen here as sooty discolouration & holes in the weld.


Sometimes you can get away with it by cleaning the surface again & grinding the weld off and going over it again. The "dirt" floats to the top of
the weld pool so it gets removed when you grind the weld off (in theory - if it's not too bad).


In this case, the contamination just kept coming through.


The weld continues to grow & still keeps cracking.


The final complete mess! Full of holes & craters. Still cracked, still leaking - a complete waste of time.
The correct way to do this would have been to strip the gearbox completely so that the casing could be thoroughly cleaned inside & out, the cracks could be ground out to remove any dirt/old oil in them & it could be welded on both sides to ensure a good weld. Then rebuild the gearbox.
But that would have cost more than buying a secondhand gearbox, which is what the customer ended up doing & we should have told him to do in the first place!
You live & learn.